
6 JavaScript Design Patterns you must know!
Keep yourself informed about the most current JavaScript Design Patterns.


Introduction
Welcome to the world of JavaScript design patterns! In this article, we will explore six essential design patterns that every JavaScript developer should know. These patterns are powerful tools that can enhance your code's organization, maintainability, and overall quality. Whether you're a beginner or an experienced developer, understanding and applying these design patterns will undoubtedly elevate your JavaScript skills to new heights. So, let's dive in and discover the key patterns that will empower you to write cleaner, more efficient JavaScript code.
What is a Design Pattern?
Design patterns, in the context of software development, are proven solutions to recurring problems that arise during the design and implementation of code.
They serve as blueprints or templates for structuring and organizing code in a way that promotes maintainability, reusability, and scalability. These patterns encapsulate best practices and collective wisdom accumulated by experienced developers over time.
At their core, design patterns provide a common language and set of guidelines for developers to tackle common challenges in software development. They offer a way to approach complex problems by breaking them down into smaller, manageable pieces, making the development process more efficient and effective.
Why Should We Use Design Patterns?
Using design patterns in JavaScript (and any other programming language) offers several compelling advantages. Let's explore why incorporating design patterns into your coding practices is essential:
Reusability and Modularity: Design patterns promote reusability by providing standardized solutions to common problems. By implementing design patterns, you can create modular code that can be easily reused in different parts of your application or in future projects. This not only saves development time but also improves code quality and consistency.
Code Organization and Clarity: Design patterns encourage a structured approach to code organization. They provide clear guidelines on how different components of your code should interact with each other, resulting in cleaner, more understandable code. Design patterns enhance code readability and make it easier for other developers to understand and maintain your code.
Scalability and Flexibility: As applications grow in complexity, maintaining code becomes challenging. Design patterns address this issue by providing scalable solutions that can adapt to changing requirements. By using design patterns, your code becomes more flexible and easier to extend, ensuring that your application can evolve without excessive refactoring.
Collaboration and Communication: Design patterns serve as a common vocabulary among developers. By using well-known design patterns, you establish a shared understanding of the code's structure and behavior. This facilitates communication and collaboration within development teams, making it easier to discuss and share ideas.
Best Practices and Avoiding Pitfalls: Design patterns embody years of the collective experience and best practices from seasoned developers. By leveraging these patterns, you can avoid common pitfalls and mistakes. Design patterns encapsulate proven solutions that have been thoroughly tested and validated, reducing the chances of introducing bugs and errors into your code.
In summary, design patterns provide a structured approach to software development, enabling developers to create efficient, reusable, and maintainable code. By utilizing design patterns in your JavaScript projects, you can streamline the development process, improve code quality, and foster collaboration among team members.
In the upcoming sections of this article, we will dive into six essential JavaScript design patterns that every developer should be familiar with. By mastering these patterns, you will enhance your JavaScript skills and be equipped to tackle various coding challenges with confidence. So, let's embark on this journey to unlock the power of JavaScript design patterns!
Module Pattern
The JavaScript Module Pattern is a widely used design pattern that helps encapsulate and organize code into modular, self-contained units. It provides a way to create private and public members, effectively preventing namespace pollution and promoting code reusability.
In JavaScript, there are different ways to create module patterns that encapsulate and organize code:
Object Literal
The JavaScript module pattern using an object literal is a way to encapsulate related properties and methods within a single object. It provides a simple and straightforward approach to creating modular code. Here's an example:
 const myModule = {
   property1: 'value1',
   property2: 'value2',
   method1: function() {
     // code here
   },
   method2: function() {
     // code here
   }
 };
In this example,
myModuleis an object that serves as a container for our module. It contains properties (property1,property2) and methods (method1,method2) that define the functionality of the module.The properties can hold any type of data, such as strings, numbers, or even other objects. The methods are functions that perform specific actions or operations.
By using this module pattern, we can group related functionality together, making it easier to organize and maintain our code. Access to the properties and methods within the module is done using the dot notation.
For instance, to access
property1frommyModule, we would usemyModule.property1. Similarly, to invokemethod1, we would callmyModule.method1().The module pattern with object literals provides a convenient way to create self-contained modules in JavaScript, avoiding global namespace pollution and promoting code organization. It's particularly useful when you want to group related functionality or define a set of utilities or helper functions.
Immediately Invoked Function Expression ( IIFE ):
An IIFE is a self-invoking anonymous function that creates a private scope for your module. This pattern allows you to define private variables and expose only the necessary functions or properties.
Let's explore an example of how the Module Pattern can be implemented in JavaScript:
 const Module = (function() {
   // Private variable
   let privateVar = 'I am private';

   // Private function
   function privateFunction() {
     console.log('This is a private function.');
   }

   // Public members
   return {
     publicVar: 'I am public',

     publicFunction() {
       console.log('This is a public function.');
       privateFunction(); // Accessing private function within the module
     }
   };
 })();

 // Usage
 console.log(Module.publicVar); // Output: "I am public"
 Module.publicFunction(); // Output: "This is a public function." followed by "This is a private function."
In this example, we create a module named
Moduleusing an IIFE. Inside the IIFE, we have a private variableprivateVarand a private functionprivateFunction. These private members are inaccessible from outside the module, ensuring data privacy and encapsulation.The module also exposes public members, such as
publicVarandpublicFunction, which can be accessed from outside the module. These public members can interact with the private members, providing controlled access to the encapsulated functionality.ES2015 Modules
ES2015 brought in native JavaScript modules, which provide a convenient way to encapsulate code within separate files. Modules help maintain privacy by default, keeping their internal values inaccessible and unmodifiable. Only the values explicitly marked for export with the export keyword can be accessed and utilized by other files. This allows for better control over the visibility and accessibility of variables and functions, promoting encapsulation and modular development in JavaScript applications.
Ways to use module feature:
HTML Tag
In HTML files, you can use the
type="module"attribute in the script tag to indicate that the script contains an ES2015 module.Each script file is treated as a separate module.
You can use the
importandexportkeywords within the script file to define dependencies and expose functionality.Here's an example:
Importing
module1.jsfile in HTML using <script> tag with attributetype="module". Thismodule1.jsfile is importing properties and methods from another script filemodule2.jsusing theimportkeyword.<!-- index.html --> <!DOCTYPE html> <html> <head> <script type="module" src="module1.js"></script> </head> <body> <!-- HTML content --> </body> </html>// module1.js import { sayHello } from './module2.js'; sayHello('John'); // Output: "Hello, John" console.log(greeting); // Output: Error: The requested module '/module2.js' does not provide an export named 'greeting'// module2.js const greeting = "Hello"; export function sayHello(name) { console.log(greeting +", "+ name); }Here, in module2.js we can see that the
greetingproperty is not exported and hence when we tried to access this property insidemoudle1.js, got an error saying "Error: The requested module '/module2.js' does not provide an export named 'greeting'"
Node
In Node, you can use ES2015 modules either by:
Using the
.mjsextensionAdding
"type": "module"to yourpackage.json
// package.json
{
"type": "module",
"name": "my-node-app",
"version": "1.0.0",
"main": "index.js"
}
After configuring the package.json file or naming script files with an extension as .mjs, you can use ES2015 module features in all script files and can use import and export keywords.
  // module1.js
  import { sayHello } from './module2.js';

  sayHello('John'); // Output: "Hello, John"
  console.log(greeting); // Output: Error: The requested module '/module2.js' does not provide an export named 'greeting'
  // module2.js
  const greeting = "Hello";
  export function sayHello(name) {
    console.log(greeting +", "+ name);
  }
The JavaScript Module Pattern offers several benefits, including:
Encapsulation: The Module Pattern enables us to encapsulate related variables and functions, keeping them private and protected from external interference.
Reusability: By creating self-contained modules, we can reuse them in different parts of our application or in other projects, promoting code reusability and reducing duplication.
Dependency Management: Modules can define their dependencies explicitly, ensuring that they have access only to the required resources. This promotes cleaner code and avoids unnecessary coupling.
Clear Interface: With the Module Pattern, we can clearly define a public API that communicates the intended usage and functionality of the module. This makes it easier for other developers to understand and interact with the module.
Singleton Pattern
The JavaScript Singleton Pattern is a design pattern that ensures the existence of only one instance of a particular class throughout the application. It restricts the instantiation of a class to a single object, providing a global point of access to that object.
The Singleton Pattern is useful in scenarios where we need to manage a shared resource or when we want to control access to a specific instance. It helps maintain consistency and avoids conflicts that may arise from multiple instances of the same class.
There are several ways of creating a Singleton Pattern :
- Using ES2015
class
let instance;

// 1. Creating the `Counter` class, which contains a `constructor`, `getInstance`, `getCount`, `increment` and `decrement` method.
// Within the constructor, we check to make sure the class hasn't already been instantiated.
class Counter {
  constructor() {
    if (instance) {
      throw new Error("You can only create one instance!");
    }
    this.counter = counter;
    instance = this;
  }

  getCount() {
    return this.counter;
  }

  increment() {
    return ++this.counter;
  }

  decrement() {
    return --this.counter;
  }
}

// 2. Setting a variable equal to the the frozen newly instantiated object, by using the built-in `Object.freeze` method.
// This ensures that the newly created instance is not modifiable.
const singletonCounter = Object.freeze(new Counter());

// 3. Exporting the variable as the `default` value within the file to make it globally accessible.
export default singletonCounter;
Using Objects
Creating objects directly, without relying on classes, offers the advantage of simpler and cleaner code.
 let counter = 0;

 // 1. Create an object containing the `getCount`, `increment`, and `decrement` method.
 const counterObject = {
   getCount: () => counter,
   increment: () => ++counter,
   decrement: () => --counter,
 };

 // 2. Freeze the object using the `Object.freeze` method, to ensure the object is not modifiable.
 const singletonCounter = Object.freeze(counterObject);

 // 3. Export the object as the `default` value to make it globally accessible.
 export default singletonCounter;
Exporting the frozen object directly, without declaring multiple variables, is also possible.
 let counter = 0;

 export default Object.freeze({
   getCount: () => counter,
   increment: () => ++counter,
   decrement: () => --counter,
 });
The JavaScript Singleton Pattern, whether implemented with
Object.freeze()or other techniques, offers the benefits of maintaining a single instance, controlling access to shared resources, and ensuring consistency throughout the application.
Proxy Pattern
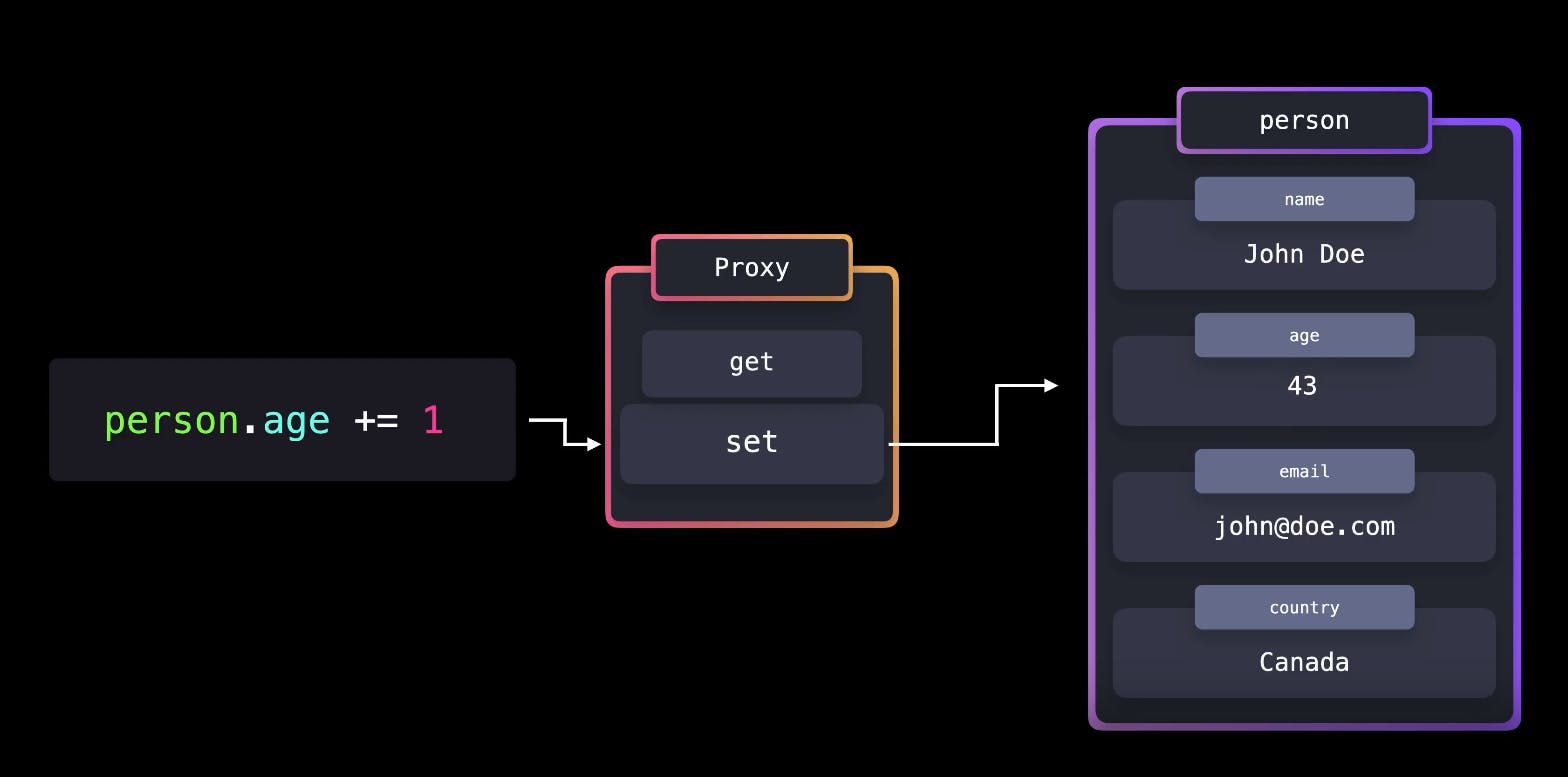
The JavaScript Proxy Pattern is a powerful design pattern that allows us to intercept and control operations performed on objects. It acts as a protective barrier or middle layer between the client code and the target object, providing a way to add custom behavior or restrictions to object interactions.
The Proxy Pattern involves creating a proxy object that wraps around the original object and intercepts the operations performed on it. This gives us the ability to modify the default behavior of the object without modifying its underlying implementation.
Let's explore an example of how the Proxy Pattern can be implemented in JavaScript:
// Target object
const targetObject = {
  sensitiveData: 'This is sensitive data',
  accessGranted: false,
};

// Proxy object
const proxyObject = new Proxy(targetObject, {
  get(target, property) {
    if (property === 'sensitiveData' && !target.accessGranted) {
      throw new Error('Access to sensitive data denied!');
    }
    return target[property];
  },
  set(target, property, value) {
    if (property === 'sensitiveData' && !target.accessGranted) {
      throw new Error('Access to modify accessGranted property denied!');
    }
    target[property] = value;
    return true;
  },
});

// Usage
console.log(proxyObject.sensitiveData); // Throws an error: "Access to sensitive data denied!"

proxyObject.accessGranted = true;
console.log(proxyObject.sensitiveData); // Output: "This is sensitive data"

proxyObject.sensitiveData = 'Modified sensitive data'; // Throws an error: "Access to sensitive data denied!"
The built-in Reflect object makes it easier to manipulate the target object.
Instead of accessing properties through target[prop] or setting properties through target[prop] = value, we can access or modify properties on the target object through Reflect.get() and Reflect.set(). The methods receive the same arguments as the methods on the handler object.
// Target object
const targetObject = {
  sensitiveData: 'This is sensitive data',
  accessGranted: false,
};

// Proxy object
const proxyObject = new Proxy(targetObject, {
  get(target, property) {
    if (property === 'sensitiveData' && !target.accessGranted) {
      throw new Error('Access to sensitive data denied!');
    }
    //return target[property];
    return Reflect.get(target, property)
  },
  set(target, property, value) {
    if (property === 'sensitiveData' && !target.accessGranted) {
      throw new Error('Access to modify accessGranted property denied!');
    }
    //target[property] = value;
    Reflect.set(target, property, value);
    return true;
  },
});

// Usage
console.log(proxyObject.sensitiveData); // Throws an error: "Access to sensitive data denied!"

proxyObject.accessGranted = true;
console.log(proxyObject.sensitiveData); // Output: "This is sensitive data"

proxyObject.sensitiveData = 'Modified sensitive data'; // Throws an error: "Access to sensitive data denied!"
The JavaScript Proxy pattern offers several benefits, including interception and control over object access, validation and security checks, data manipulation and transformation, caching and optimization, logging and debugging support, dynamic object extension, and separation of concerns. Proxies provide a flexible way to customize and enhance object behavior, improving code organization and facilitating advanced features in JavaScript applications. However, it's important to use proxies judiciously and consider their potential impact on performance and complexity.
Observer Pattern
The JavaScript Observer Pattern, also known as the Publish/Subscribe Pattern, is a behavioral design pattern that establishes a relationship between objects where changes in one object (the subject) are automatically reflected in other objects (the observers). This pattern facilitates loose coupling and enables objects to communicate with each other without having explicit knowledge of one another.
In the Observer Pattern, the subject maintains a list of observers and notifies them whenever a change occurs. The observers subscribe to the subject and receive updates accordingly. This decoupled approach allows for dynamic and flexible communication between objects.
Let's explore an example of how the Observer Pattern can be implemented in JavaScript:
// Subject (Observable)
class Subject {
  constructor() {
    this.observers = [];
  }

  subscribe(observer) {
    this.observers.push(observer);
  }

  unsubscribe(observer) {
    this.observers = this.observers.filter(obs => obs !== observer);
  }

  notify(data) {
    this.observers.forEach(observer => observer.update(data));
  }
}

// Observer
class Observer {
  constructor(name) {
    this.name = name;
  }

  update(data) {
    console.log(`${this.name} received an update: ${data}`);
  }
}

// Usage
const subject = new Subject();
const observer1 = new Observer("Observer 1");
const observer2 = new Observer("Observer 2");

subject.subscribe(observer1);
subject.subscribe(observer2);

subject.notify("Hello observers!"); // Output: "Observer 1 received an update: Hello observers!" and "Observer 2 received an update: Hello observers!"

subject.unsubscribe(observer2);

subject.notify("Goodbye observers!"); // Output: "Observer 1 received an update: Goodbye observers!"
In this example, we create a Subject class that represents the subject being observed. It maintains an array of observers and provides methods to subscribe, unsubscribe, and notify the observers.
The Observer class represents the observers that are interested in receiving updates from the subject. Each observer has a name and an update method that gets called when a notification is received.
We demonstrate the usage of the Observer Pattern by creating a Subject instance, subject, and two Observer instances, observer1 and observer2. The observers subscribe to the subject using the subscribe method and receive updates through the update method.
When the subject's state changes, it notifies all the subscribed observers by calling their update methods. Observers can then perform actions based on the received data.
The JavaScript Observer Pattern allows for dynamic and decoupled communication between objects. It promotes flexibility, extensibility, and maintainability in software design.
Factory Pattern
The JavaScript factory pattern is a way to create objects in a flexible and reusable manner. Think of it like a factory that produces different types of objects based on certain criteria. Instead of directly creating objects using the new keyword, you have a factory function that accepts parameters and returns a new object with specific properties and behaviors. This allows you to create multiple instances of objects with similar characteristics without repeating the object creation code.
Let's explore an example of how the Factory Pattern can be implemented using functions in JavaScript:
// Factory function to create person objects
function createPerson(name, age) {
  // Create a new object
  const person = {};

  // Set properties
  person.name = name;
  person.age = age;

  // Method
  person.greet = function() {
    console.log("Hello, my name is " + this.name + " and I am " + this.age + " years old.");
  };

  // Return the created object
  return person;
}

// Usage:
const person1 = createPerson("John", 30);
const person2 = createPerson("Jane", 25);

person1.greet(); // Output: Hello, my name is John and I am 30 years old.
person2.greet(); // Output: Hello, my name is Jane and I am 25 years old.
In this example, createPerson is a factory function that takes name and age as parameters. It creates a new object, sets the properties (name and age), defines a method (greet), and returns the created object. You can then call the greet method on each person object created by the factory function.
Using the factory pattern allows you to create multiple person objects with different names and ages by calling the createPerson function with different arguments. It provides a convenient way to encapsulate the object creation process and reuse the code for creating similar objects in your application.
It promotes code reusability, modularity, and makes object creation more customizable.
Prototype Pattern
The prototype pattern in JavaScript is a handy approach for sharing properties among multiple objects of the same type. The prototype, which is a built-in object in JavaScript, allows objects to access shared properties through the prototype chain.
In practical terms, when we need to create numerous objects of the same type, we can utilize ES6 classes to generate multiple instances. Let's consider the example of creating multiple dogs. In our scenario, dogs have a name and the ability to bark.
class Dog {
  constructor(name) {
    this.name = name;
  }

  bark() {
    return `Woof!`;
  }
}

const dog1 = new Dog("Daisy");
const dog2 = new Dog("Max");
const dog3 = new Dog("Spot");
Notice here how the constructor contains a name property, and the class itself contains a bark property. When using ES6 classes, all properties that are defined on the class itself, bark in this case, are automatically added to the prototype.
We can see the prototype directly by accessing the prototype property on a constructor, or through the __proto__ property on any instance.
console.log(Dog.prototype);
// constructor: ƒ Dog(name, breed) bark: ƒ bark()

console.log(dog1.__proto__);
// constructor: ƒ Dog(name, breed) bark: ƒ bark()
The value of __proto__ on any instance of the constructor, is a direct reference to the constructor's prototype! Whenever we try to access a property on an object that doesn't exist on the object directly, JavaScript will go down the prototype chain to see if the property is available within the prototype chain.

The prototype pattern is very powerful when working with objects that should have access to the same properties. Instead of creating a duplicate of the property each time, we can simply add the property to the prototype, since all instances have access to the prototype object.
Since all instances have access to the prototype, it's easy to add properties to the prototype even after creating the instances.
Say that our dogs shouldn't only be able to bark, but they should also be able to play! We can make this possible by adding a play property to the prototype.
class Dog {
  constructor(name) {
    this.name = name;
  }

  bark() {
    return `Woof!`;
  }
}

const dog1 = new Dog("Daisy");
const dog2 = new Dog("Max");
const dog3 = new Dog("Spot");

Dog.prototype.play = () => console.log("Playing now!");

dog1.play();
The JavaScript prototype pattern offers benefits such as property sharing, inheritance, dynamic updates, method overriding, improved performance, dynamic object construction, and code organization. It enables efficient memory usage, code reuse, and customization while providing a hierarchical structure for objects. By leveraging the prototype pattern, JavaScript applications can achieve modularity, scalability, and better performance.
Summary
Conclusion:
In this article, we have explored six important JavaScript design patterns that every developer should be familiar with. We started by understanding what design patterns are and why they are valuable in software development. Design patterns provide proven solutions to common programming challenges, promoting code reusability, maintainability, and flexibility.
We delved into each design pattern, providing clear explanations and code examples to illustrate their implementation. We covered the Module Pattern, which helps in organizing and encapsulating code, promoting modular and reusable components. The Singleton Pattern, which ensures that only one instance of a class is created and provides a global point of access to it. The Proxy Pattern, which allows us to control object interactions and add custom behavior or restrictions. The Observer Pattern, which facilitates communication between objects and enables loose coupling. The Factory Pattern, which abstracts object creation and provides a flexible way to create objects based on certain conditions or parameters. And finally, the Prototype Pattern, which allows us to share properties among many objects of the same type and promotes efficient memory utilization.
By understanding and applying these design patterns, you can enhance your JavaScript coding practices and tackle various programming challenges with confidence. These patterns offer proven solutions and best practices that can improve the quality, maintainability, and scalability of your codebase.
Remember, design patterns are tools in your toolkit, and their selection and usage depend on the specific requirements of your project. As you gain more experience and exposure to different scenarios, you'll develop a deeper understanding of when and how to apply these patterns effectively.
With the knowledge of these six JavaScript design patterns, you are well-equipped to tackle complex software development projects and build robust and scalable applications. Embrace these patterns, experiment with them, and adapt them to suit your specific needs. By incorporating design patterns into your development workflow, you'll elevate your coding skills and become a more proficient JavaScript developer.
Keep exploring, learning, and applying these design patterns to unlock new possibilities and advance your journey as a JavaScript developer. Happy coding!